Hand Sewing Leather
Leather Sewing - Intro
While admiring a well-crafted leather handbag or belt we might conclude that the leather sewing is beautiful and perfect. We might wonder how the leather sewing process happened. Was it sewing leather by hand or using a sewing machine that sews leather? Did you know that you can learn how to do leather sewing by hand?
Sewing leather by hand is sometimes referred to as hand stitching leather. While there are many models of leather sewing machines that do a wonderful job when sewing leather, we will learn in this guide how to sew leather by hand. We will see that we can do an awesome job of sewing leather just by applying the steps we are about to learn. At the end of this guide, we will provide links to some sewing machines that sew leather and items that you need to sew leather by hand.
It will be amazing to see how easy and beautiful our hand stitched leather is and what a wonderful outcome we achieve. We are looking for ease and outcome when we do leather sewing (leather hand stitching). Leather hand stitching is quick, easy and affordable.
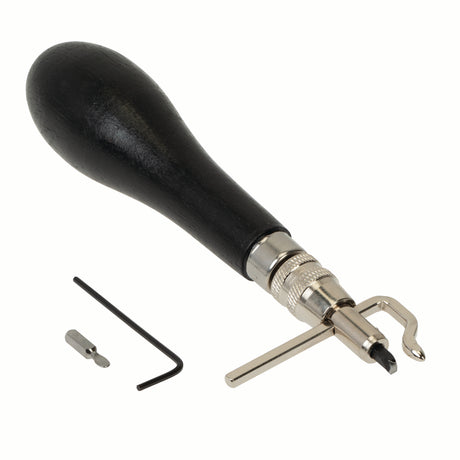
Chuck Dorsett our resident leather crafter will be teaching us the art of leather sewing by hand. We will start by using a hand stitching kit that has everything you will need to sew leather. This kit contains Ritza Tiger Thread, John James Saddler's Harness Needles, a Stitch Groover, a Flat Chisel Set and a Stitching Pony (Sewing Pony).
This guide is geared toward a leathercraft beginner or someone who has started leather crafting, but has not yet done leather sewing by hand.
We will be using a saddler's stitch. It is the only stitch that Chuck Dorsett uses, and, it is beautiful and in his opinion, stronger than a leather sewing machine stitch. The great thing about learning this leather hand stitch is that we can make projects as intricate as a leather briefcase with nothing more than a coffee table or kitchen table to work on. We can hand sew patent leather, make journal covers, holsters and sheaths just by learning to do leather sewing by hand (leather saddle stitching).
Yes, sewing can be tedious, but not really when you get the hang of it. You can sew 2 ½” in one minute and it looks as beautiful as a leather sewing machine stitch.
Making Leather Groove Lines & Using a Groover
Adding a groove line to leather:
The primary job of a groover is to sink a trench along the edge of our leather. The groove line serves two purposes.
- It is a great guide for our stitching chisels.
- It will allow our stitch line to sink down into the leather and that will reduce the chance of the thread snagging or catching on things when the project is finished.
The stitch groove guide arm is adjustable so we can move our groove line in or out from the edge of our leather.
Pro tip: If we do lots of leather crafting it is great to have two stitch groovers. Take one groover and put yellow tape on the base of the handle and set it for 1/8”. We can quickly and easily grab it to make our sewing grooves (stitch lines).
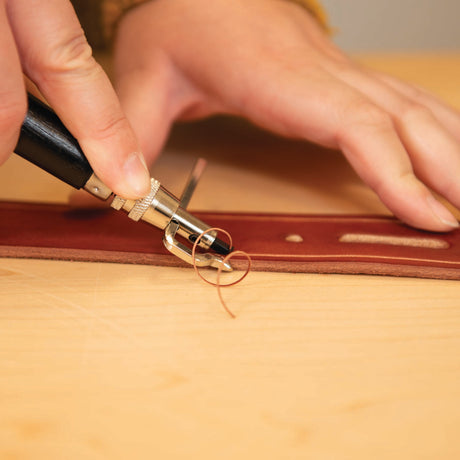
How to use a Groover:
- Our groover has a guide arm and a cutting head. After setting the guide arm to 1/8” for your chisel line, butt the guide arm against the edge of the leather. Lets bring our hand that is holding the groover up about 45 degrees and give it a little counterclockwise pressure as we slide down the leather and cut a groove.
- That will make a nice clean parallel line to our leather's edge. We can make multiple passes on this but keep this warning in mind, by doing several passes we would create a tab that will tear off. This would ruin the durability of our project.
Pro tip: Although the primary job of our groover is to create a guide for our chisel line, it looks good on all our project edges even if we don't stitch. A groove line really gives a finished look to our leather edges.
How To Hand Sew Round Corners and Square Corners
Leather sewing practice exercises
We will be doing two exercises to get practice with leather sewing by hand. We will sew two pieces of leather together that have a square corner and two pieces that have a rounded corner. This will teach us how to handle both applications.
How to Hand Sew Leather with a Square Corner
- We will practice marrying two pieces of leather together that are same size squares. We will groove and chisel them separately and then sew the leather together.
- Take our first piece of leather and drop in a groove line on two sides where the lines will meet in the corner. We will run the groover right off the edge for this practice piece. Do the same process to the matching piece of leather on its face side. Typically, we would bevel and slick the edge so putting the grooved line right to the edge would not be an issue.
- Now let's start to chisel. Take one piece of our square corner leather and the 1-tine chisel. Exactly on the corner groove, drive a tine hole with our tine handle slightly leaning toward the outside corner. (Watch video above).
- Now take the 2-tine chisel and line up one of the tines in the corner hole and gently just mark it by aligning it in the groove hole and gently tapping the chisel once. Do the same with the other side of the corner, but just mark it don't pierce the leather, yet.
- Now let's take the 6-tine chisel and put it in the second marked hole from the corner. Feel it sink into the groove line. Tap the chisel, piercing the leather and making the stitching holes. We'll work our way out to the end. There may be enough room for a single hole to finish the end. If so, grab the 2-tine chisel, put the first tine into last hole and mark it. Then use the single tine to make the hole. Repeat on the other edge of the leather. Now you should have two stitch lines that meet at the corner.
- Grab the other piece of the square leather and do the same process as above. You can line up your first chiseled leather piece to the piece you are working on and eyeball it to make sure it looks spaced right, but this process should make them line up nicely. When you start stitching, they line up more.
- It's time to start sewing leather by hand, but first some tool tips and info.
- Tool talk:
- A stitching pony or sewing pony is an immense help to hold the leather while we sew. For us crafters, the stitching pony allows us to clamp it on our table. We are also able to clamp it in all manner of configurations that helps us not to fatigue our arms and it keeps our hands in a natural position.
- A stitching horse or sewing horse is different as it allows us to sit on it while sewing.
- Chuck Dorsett suggests putting some leather pieces on the top of the stitching pony to protect our leather projects from dings. See video above.
- Ritza Tiger Thread. You get three basic colors in the kit, but it is also available in a variety of beautiful colors. Ritza thread is a very strong braided thread and one highly recommended by Chuck Dorsett.
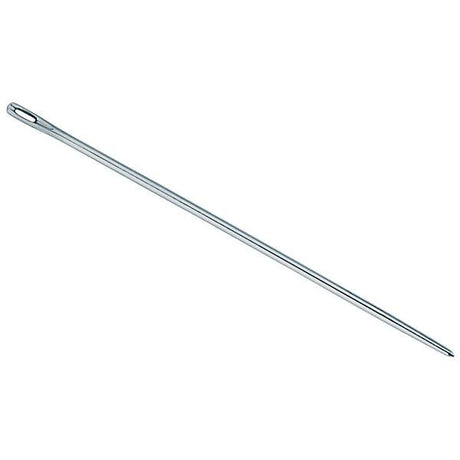
- John James sewing needles are extremely strong with a large eye so the big waxed thread can go through it, and they don't have sharp points.
How to Hand Sew Leather with a Rounded Corner
- First, take one of your practice pieces of leather and mark a round corner and cut it with a utility knife.
- A leather project with rounded corners requires a different process to make sure our rounded corners match. For our practice, we will glue our backing onto our face leather. It would be very difficult to cut two leather pieces that are flopped with a round corner that matches.
- What we do to make matching rounded corners easier is glue the first rounded corner, face up onto the backing leather piece. Then, we use the face leather as our straight edge and cut the backing leather with a utility knife. You'll be amazed at how clean our edge is going to be.
- Let's cut both of our straight edges first and leave the rounded corner for the last cut. Now, slowly cut the rounded corner by using the face leather as a guide. We can do small cuts to work our way around the rounded corner.
- Now, let's make our groove line on the front side. We will start at one side and groove over to the end of the other side, grooving around the rounded corner. Do not put a groove line on the backside because our chisel line would probably not line up to a groove line on the back and it would look terrible if they were misaligned. So, let's just skip the groove line on the back.
-
Move the leather onto a quartz or marble block with our cutting board on top. It's time to drop in our chisel line. We will use a 1/8” straight tine that comes in the sewing leather kit. It is a favorite of Chuck Dorsett's, but we could also use a 1/8” diamond hole chisel.
Note about stitching chisel tines: A sign of a quality tine is as the spread gets smaller so does the tine. We start with a 6-tine chisel that has a 1/8” spread. Typically, that equals 5 stitches per inch.
Note: 4 stitches really gets big, and 6 stitches starts to group.
-
Start on one end of the leather sample and drop the chisel into the groove line keeping the chisel straight up and down. Tap it a couple of times with our mallet. We can look on the backside and see that our tines pierce and show through the leather.
Note: To get the chisel out of the leather, do not rock it left and right because that reams open the holes. Instead, we take our index finger and line it up to the left side of the chisel and walk it out gently by going up and down.
- Take the first tine and put it in the last hole feeling the chisel sink down into the groove line and tap it a couple of times with the rawhide mallet.
- Now we are nearing the corner and we now choose the 4-tine. Putting the 4-tine, first tine into the last hole, feeling it sink into the groove line, give it two taps with the mallet and then pull it out.
- Now, let's use a 2-tine chisel by putting the first tine in the last hole. Let's just work our way around the corner but don't run the tine through the leather, just mark the holes around the corner. When we get to where the groove line straightens out again, stop.
- Use the one tine chisel and make the holes, one at a time, around the corner where you marked. This will make consistent hole spacing and a nice stitch line.
- Now, we can go back and use the 6-tine chisel on the straight groove line to finish making the stitch holes. But as we get to the edge of the leather, we need to eyeball the space we have left to make stitch holes. If we bring the last hole to close to the edge it won't be durable. So, we may need to use one of the smaller chisels. For this example, the 3-tine chisel worked perfectly for making the last two sets of stitching holes.
How to make a backstitch closure on leather
- Let's take a clip and put it on the two edges of the square leather just to keep it lined up when we put it into the sewing pony and until we get a few stitches in it.
- Now drop the two pieces of leather into the sewing pony. Since we have chiseled both sides of the square example, here is the way we hand stitch this type of application.
- First load your thread:
Take Ritza Tiger Thread and cut it 4 times the total length of the project we are going to sew. The thing that we don't want is to start sewing and get almost to the end and be left with two little nubs to try and tie a knot. Thread is inexpensive and we should not skimp.
Take one end of the thread and load it into the needle. Take the other end of the thread and load it into the second needle.
The thread is very long. We can choke up or pull on our extra thread to make it shorter and easier to work with. We pull both ends of the thread all the way out with each stitch, giving it a little tug with each hand to tighten it. We can extend the choked thread as needed. This process can be better understood by watching the video above around the 15:00 mark.
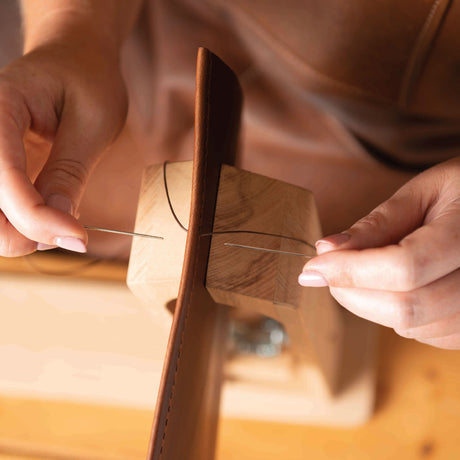
- Start on either side, it does not matter. Put one needle in the first hole, pull thread through and then equalize the thread.
- Now push needles in from both sides, make an X shape with the needles, draw that stitch down to tighten and seat the stitch. Repeat that process all the way down to the last hole in the square leather piece.
- A sewing machine will backstitch but we are going to have to backstitch by hand. We will have to squeeze both needles through two pieces of thread inside the previous hole that we just sewed. It is a tight squeeze, and we may have to work at it, but it makes a secure closure. We will need to go back 3 or 4 stitches by repeating this process
- Let's take our utility knife and hold it close to the thread that we pulled through. Take each side of the thread and run it against the blade to finish off our backstitching.
- Tip for stitching long pieces of leather:
When sewing a long leather strap (example: belt or brief case strap) we can run into a problem because we are constantly having to move our project in the sewing pony. To remedy that problem, we can take a piece of suede string and attach it to the rafter and tie a clip on the end. The clip can be adjusted by tying up slack with the suede string. We can then clip the end of our belt or strap, and it will hold steady while it is loaded in the sewing pony. This will allow us to stitch leather and keep our hands in a comfortable position. When we need to move it, all we must do is loosen the sewing pony and tie the suede up so the clip is raised.
- How to clean wax build-up on a leather stitching needle:
You'll notice that as you stitch, leather wax will build up on your needles and hang in the needle's eye making it hard to thread the needle. Just grab your needles (without thread), eyes on one end and run a lighter under the eyes. Take a cloth and wipe the melted wax off while it is hot. The needles will be just like new and ready to go.
How to Saddle Stitch Leather
- It's time to start sewing leather by hand. Load the rounded corner sample leather into the stitching pony and secure clamp.
- Take Ritza Tiger Thread and cut it 4 times the total length of the project we are going to sew. The thing that we don't want is to start sewing and get almost to the end and be left with two little nubs to try and tie a knot. Thread is inexpensive and we should not skimp.
- Take one end of the thread and load it into the needle. Take the other end of the thread and load it into the second needle.
- Since the thread is very long, we can choke up or pull on our extra thread to make it shorter and easier to work with. We pull both ends of the thread all the way out with each stitch, giving it a little tug with each hand to tighten it. We can extend the choked thread as needed.
This process can be better understood by watching the video around the 15:00 mark.
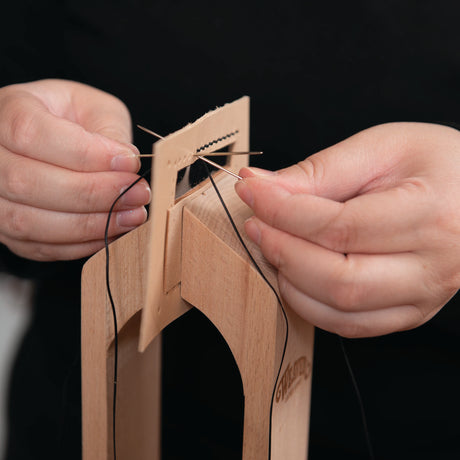
- The saddler's stitch is just a back-and-forth stitch, easy to remember how to get started because we take one needle and push it through the first hole on the left-hand side.
Note: We have the leather loaded in the sewing pony so the face (or side we punched from) is facing outward toward the left. The point to remember is the hole that we punched from is funnel shaped and the hole on the other side is pucker shaped. So, by starting the needle through the funnel shaped or (punched from side) opens the back hole. If you are right-handed, the leather can be loaded so you can lead with the right hand.
- Finish pulling the needle through and equalize the thread between the two needles. Take the needle in the left hand and push it halfway between the second hole. Then take the needle in the right hand and push it halfway through the same (second) stitch hole but keep it in front of the other needle. Pull lightly downward on both needle's eyes. Notice how that makes an X. The first needle in, opens the hole further on the opposite side so the second needle can slide in easier, in front of the first needle.
- Let's take our fingers and go from the needle's eyes to the needle's tips and pull both needles through as far as the thread reaches and give a little tug to tighten and seat our previous stitch
Note: You don't have to pull super hard.
- Pro tip: Perhaps we don't have a lot of strength in our hands, we can do leather sewing this way:
Put the first needle through like in the previous step and pull the thread back towards us, then put the second needle through the same hole making sure you run it through in front of the thread you just pulled toward you. That will keep you from splitting a stitch.
Another tip to prevent you from making blisters on your fingers:
When we sew large projects, we pull and tighten each stitch putting pressure on different fingers each stitch. One area will not be overly subjected to the friction of pulling and tightening the thread.
- When we get to the next to the last stitch hole, let's pop the glue that is holding the leather together at the end. The glue is there to hold long enough to get our chisel and thread line in.
- On the last hole, we will tie a square knot. Put the needle in on the left side but only put it through the first ply and push needle forward. Do the same for the other side but only put needle through one ply. Tug it to tighten the stitch line down.
- We now tie a square knot. Take the right-hand thread and go over the left-hand thread, circle around and draw the knot down good and tight into the two plys of leather. Then take the left over the right, circle around and draw it down into the leather ply good and tight. There will be a little knot sticking out, but no problem because we will be hammering down our stitch line which will make the stitches look clean and consistent.
Note:Let's use our utility knife where the blade meets the base of the knife. That is a place on the blade that we rarely use, it is very sharp. Line that part of the blade up with the thread and pull the thread onto the knife blade to cut it. Don't pull the knife on the thread, but the pull the thread backward onto the knife to make the cut.
How to Hammer Down a Leather Stitch Line
When we hammer down our stitch line it does two things:
- It will close our holes, so we see thread and not holes.
- It will sink the thread line below the top grain because we have a groove in there. We can use a mallet, but we don't want our mallet at such an angle that it is going to leave hammer marks inside on our leather. For this example, we used a tack hammer and hammered the line down. It will make the stitch line clean and consistent and when we run our hand across it, we cannot even feel the thread.
- Hammer down both leather project's stitch lines and we are done with our sewing leather lessons.
Suggested Products
-


 Chuck's Pick
 -


 Chuck's Pick
John James Saddler's Harness Needles
Regular priceFrom $9.80 Sold by 25 packUnit price -


-


 Regular priceFrom $56.00Unit price
 -


 Regular priceFrom $26.50Unit price
 -


 Regular price $25.75Unit price
 -

 Chuck's PickRegular price $38.00Unit price
 -


 Regular price $33.50Unit price
 -


 Regular price $31.25Unit price
 -
 Regular price $12.20Unit price
 -


 10% off
Weaver 303 Leather Sewing Machine, Complete with Stand & Servo Motor
Sale price $1,440.00 Regular price $1,600.00Unit price -


Leather Sewing Kit for Hand Stitching
Regular price $110.00Unit price -
 Regular price $16.60 Sold by 25 packUnit price
 -


Weaver 205 Leather Sewing Machine, Complete with Stand and Servo Motor
Regular price $4,650.00Unit price -
 View Details
Adler 267 Table Model Leather Sewing Machine
Regular price $3,550.00Unit price


