By Mary Savel
I am a leatherworker (and multi-passionate crafter: knitting, crocheting, sewing, embroidery, you name it, I love making it!) who has been selling my leathergoods and crafts online since 2008 and if there’s one thing that I’ve learned over the years, it’s that you MUST have great photos of your handmade crafts if you want to successfully sell your work online.
Great product photos are the number one way for you to ensure that your customer is drawn to your products. Having great photos are so important, especially with online selling, because your customer can’t see or feel your product in person. So the job of getting your customer’s initial attention rests solely on your product photos.
It’s like a first impression. You don’t get a second chance.
How I Used to do Product Photography
Years ago, when I first started selling my leathergoods on Etsy, I was taking pictures at my studio table in a dimly lit room but I had a lot of overhead lighting so I figured I was covered.
But my photos always came out dark or sort of had an orange or yellow tone to them. They were also a bit blurry.
Not a winning combination!

It was really frustrating and it definitely played a big role in holding me back from making any sales on Etsy.
But over the years, I realized a few things about product photography.
Product Photography Myths
A lot of people think that you need to have a fancy camera or an elaborate lighting setup in order to take great product photos.
Some people think that you need to hire a professional photographer in order to get the really pro shots.
These things are great if you can afford them, but if you’re on a budget there are some very easy things that you can do instead to get great product photos on a budget.
And the good news is that there is no fancy equipment needed here!
Here are 5 easy smartphone photography tips that will improve your dark, blurry and shaky photos, not to mention help you increase sales of your leathergoods online.
Improve your Smartphone Product Photography
1 | Shoot using natural light as opposed to indoor lighting.
This is my biggest and best tip. If you only do one of these five things, do this one.
I live in NYC in what sometimes feels like a cave of an apartment. I have 2 large sliding glass doors but I also have very tall buildings all around me that block a good portion of the sunlight but even still, I’m able to get great product photos.
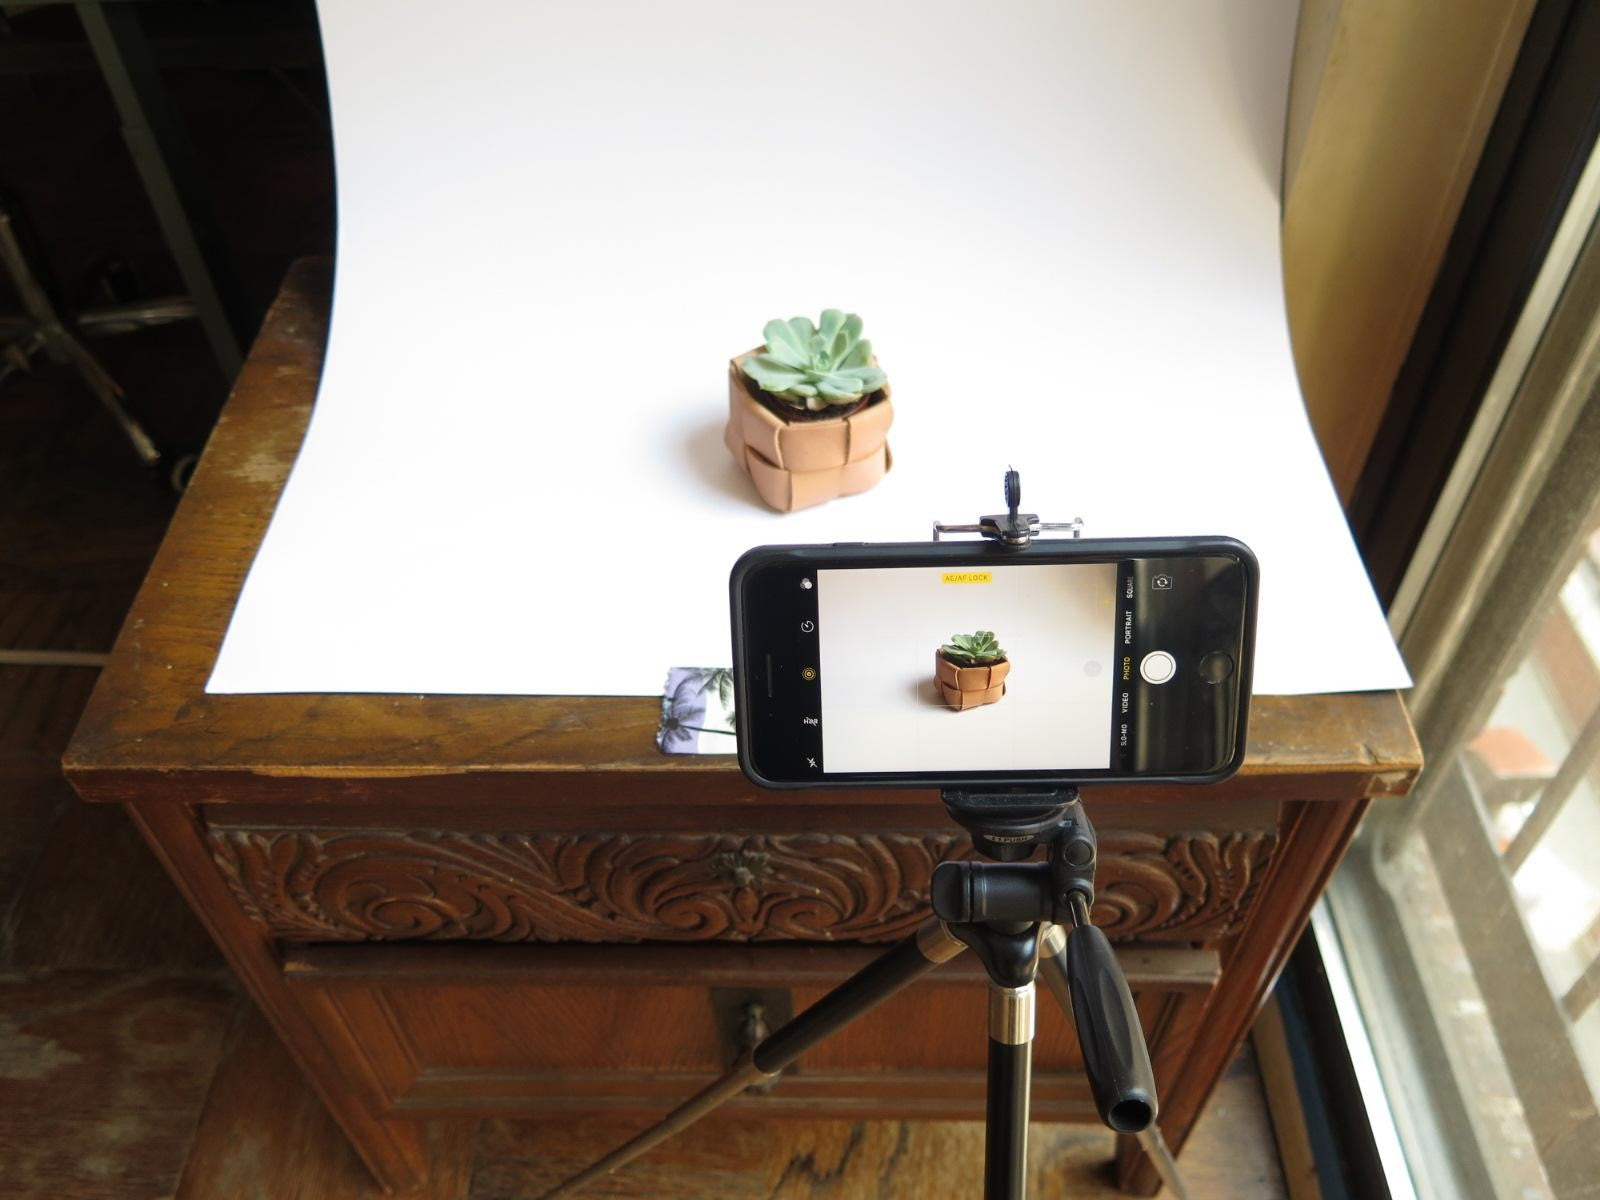
Below is a photo of my setup.

I point the camera at a wall with the sliding glass door to the right or left of whatever it is that I’m shooting.
I also make sure that the light is coming in on the side of where I have my camera positioned.
Avoid pointing the camera directly at the glass door or window, because your subject will be dark in the photo.
You don’t need a sliding glass door to capture this natural light either. You could also use a window with a table pulled up beside it.
If you live someplace where you don’t have access to a window, you can go outside to shoot your products. I’ve done this many times before as well.
I’ll pack a bag of my leathergoods that I want to shoot and some props and backdrops, head out to Central Park and make a day of it. It’s pretty fun.
If you want to take this tip one step further you can time your shoot for the optimal time of day as well.
I find that shooting in the a.m. as the sun is starting to rise to the highest point and as it’s starting to set in the afternoon are the best times to shoot, but you should experiment with this wherever you live.
Just avoid shooting when the sun is at its highest point directly overhead, otherwise, you’ll get shadows that are not going to look great in your photo.
Since I’ve stopped trying to MacGyver an at-home studio with terrible overhead lighting and instead focused more on using natural light, my photos have dramatically improved.
2 | Use a white seamless or piece of posterboard for your background.
The next thing that you can do to improve your photos and showcase your work in a professional way is to use a white or neutral background.
I see a lot of sellers on Etsy who have product shots where the product is on a desk or tabletop, but unless this is part of your brand it can look a little sloppy and be distracting for the viewer. You don’t want the potential buyer to be looking at everything else in the photo except for your product.
I am all for creating styled and lifestyle photos with my products. However, to show off the product and make it pop you’ll want some shots using a white backdrop.
The cheapest and easiest way to do this is to go to your local craft store and get a piece of white posterboard. Then take the posterboard, bend it slightly and tape the top edge to the wall and the bottom part to the floor or tabletop creating a nice curved shape.

That nice rounded poster board creates a backdrop that has zero distractions and will make your product look like it’s floating on the page.
If your products are larger, you might want to get a large roll of paper and do the same thing. I have a roll of paper that is about 5 feet wide which I purchased from a photography store (search for “seamless paper”). I use this whenever I’m shooting some of my larger handbags.
Avoid using dark-colored poster board or seamless paper that could make the product hard to see unless of course, that sort of moody and dark look is part of your branding.
3 | Use a tripod to avoid blurry photos.
I told you these were simple solutions! But hey, they work and here is why using a tripod is so easy but really helpful.
When you hold your camera in your hands and take a photo the slightest movement and even your breathing will cause you to move and the camera to shake slightly.
Even if you’ve got steady hands, you’re going to shake a bit and this shake will cause the photo to be blurry.
Blurry photos are not cute when you’re trying to show a potential customer your beautiful handcrafted products!
Also, think about this. The photo that you just snapped, while a tiny bit of blur might look okay on your smartphone’s small screen, it will stretch to double, triple or even a larger size depending on if you want to use it on your product listing or your website’s homepage.
The bigger you stretch the photo, the more blur you’re going to get.
So to eliminate the blur as much as possible and get a crisp focused photo instead, use a tripod that you can get at Best Buy or on Amazon for around $25.
Most tripods come with a little attachment that can hold your smartphone as well.
Once you’ve got your smartphone on the tripod and the tripod in place, we can take this tip one step further and set the timer on your phone.
When you push the button to take the picture, this can cause some shake as well. If you use the 3 or 10-second timer, you know that the camera is going to be perfectly still when the shutter opens and closes and captures the picture.
4| Wipe your camera lens clean
Seems like a no-brainer right? Well, you wouldn’t believe how many people forget this part and wind up with spots, smudges, and fingerprints on their photos (Believe me, because I’m speaking from personal experience on this one).
Our smartphones are in our hands about 99% of the time these days and, as a result, the lens on your camera gets smudged and dirty. Any of this dirt on the lens will come out in your photo. So simply take a cloth and wipe any dirt away before starting to shoot.
5 | Use the AE/AF function on your iPhone
AE stands for auto exposure and this is the function that you can adjust to make your photos brighter or darker.
AF stands for auto focus which controls what your camera is keeping in focus and which part isn’t.
Your camera will automatically focus and adjust the exposure if you let it, but you can control and manipulate this setting by tapping on the camera screen where you want the focus to be. You can then move your finger up and down on the little sun icon to adjust how bright or dark you want the photo to be.
If you have a few photos that you want to shoot at the same focus and exposure, hold your finger in the spot that you want your camera to focus for 3 seconds. This will lock the focus and even after you press the shutter button you’ll be able to continue to shoot with the focus and exposure that you’ve set. This is great for shooting multiple shots all at the same settings so there is consistency in your product photos.
If you’re not already using the above 5 tips in your product photography, give it a shot next time you do a shoot and see what a huge difference it will make as you can see here in my photo.

We all know that selling handmade products online can be hard as it is, let alone if you don’t have great photos. Most people will scroll right past your Etsy listing if your photos are subpar.
Product photography is a big piece of the puzzle of selling your leathergoods online, but it’s only one piece of the puzzle.
When selling your work online, whether it’s the 1st time or the 50th time, you not only want to think about your photos but also your product descriptions, marketing methods, and sales strategy. These are just a few of the things that you’ll do to help you increase your sales once you launch your leathergoods to the world.
There are a lot of steps to selling a product online, which is why I’ve created a checklist that walks you through start to finish, pre-launch to post-launch exactly how to sell your leathergoods.
You can get your copy of the checklist at www.lucrativeleathercraft.com.
Mary Savel teaches people how to make traditional leatherwork and how to sell their handmade work online, at craft fairs and to stores. She runs www.LeatherBeast.com and lives and works out of her NYC apt that she shares with 1 boyfriend and 2 cats.


